Introduction
When it comes to manufacturing plastic components and products, the art of injection molding plays a pivotal role. But what truly sets apart a successful injection molding project is the ability to design injection molded parts that seamlessly come together during assembly. In this article, we will delve into the world of designing injection molded plastic parts for assembly, where precision and foresight are the keys to success
Designing for injection molding is more than just creating a blueprint; it’s about embracing a holistic approach that takes into account various factors such as wall thickness, material selection, and assembly methodology. These elements, when carefully considered, not only result in cost-effective production but also pave the way for creating products that meet and exceed performance expectations.
In the sections that follow, we will explore these design principles and dive deeper into the key components of the injection molding assembly process. We will also answer pertinent questions about injection molding design and share invaluable insights to help you navigate this intricate terrain. So, let’s embark on this journey to discover how to design injection molded parts for assembly, where innovation meets precision.

II. How to Design for Injection Molding process
Designing for injection molding is a complex art that involves balancing creativity with practicality. It’s not just about envisioning the final product; it’s about making that vision a reality within the constraints of the injection molding process. Let’s explore some key principles and considerations that are integral to this art.
1. Design for Manufacturability (DFM)
Designing a part that looks great on paper is one thing; designing a part that can be efficiently manufactured through injection molding is another. This is where the principle of Design for Manufacturability (DFM) comes into play. DFM is all about crafting your design in a way that optimizes the manufacturing process.
Collaboration with Injection Molding Partners:
One of the cornerstones of successful DFM is collaboration. Engage closely with your injection molding partner. Their expertise can be invaluable in identifying potential issues in your design early in the process. A strong partnership can lead to a design that’s not only manufacturable but also cost-effective to produce.

2. Material Selection Matters
Choosing the right material is akin to selecting the right canvas for a masterpiece. Different plastics come with distinct properties, including strength, flexibility, and resistance to chemicals. The material you choose will significantly impact the final product’s performance.
Impact on the Final Product:
Consider the application of your product. Does it need to withstand extreme temperatures or harsh chemicals? Is strength or flexibility a critical factor? Your material selection should align with the performance requirements to ensure the product functions as intended.
3. Tolerances and Fit
In the world of injection molding, precision is king. Tolerances and fit are the yardsticks by which the quality of your design is measured. Tight tolerances and proper fit are essential for ensuring that parts come together seamlessly during assembly.

Testing and Validation:
As part of the design process, test-fit prototypes to validate tolerances and fit. This step is crucial in identifying any issues and making necessary adjustments before full-scale production.
By understanding and applying these principles, you not only design parts that are tailored for the injection molding process but also set the stage for a successful manufacturing journey. In the next section, we will delve deeper into the critical components of the injection molding assembly process.
III. Key Components of the Injection Molding Assembly Process
To create high-quality injection molded parts for assembly, it’s essential to have a deep understanding of the various components involved in the injection molding process. These components work in harmony to shape and produce the final parts. Let’s explore each of these components and their pivotal roles:
1. Injection Mold
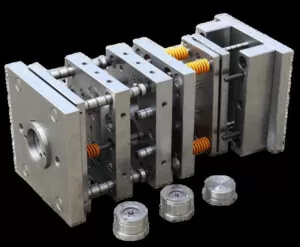
The injection mold is the heart of the injection molding process. It consists of two halves: the core and the cavity. These halves come together to form a precise mold cavity that defines the shape and features of the final part.

Role:
The injection mold’s primary role is to provide a cavity into which molten plastic is injected and shaped. The quality of the mold’s construction directly impacts the quality of the finished part.
2. Molding Machine
The injection molding machine is responsible for transforming raw plastic resin into a molten state and injecting it into the mold cavity. These injection molding machines vary in size and complexity depending on the specific project’s requirements.
Role:
The molding machine’s role is crucial in ensuring precise control over temperature, pressure, and injection speed. This control is essential for consistent part quality.
3. Ejector Pins
Ejector pins are small components within the mold that play a critical role in the removal of the finished plastic injection molded part part from the mold cavity.
Role:
After the plastic has cooled and solidified inside the mold, the ejector pins push the part out of the mold. Proper placement and design of ejector pins are essential to prevent any damage to the part’s surface.
4. Mold Surface
The mold’s surface, including the core and cavity, must be meticulously machined to create the desired part geometry. It is essential to achieve a smooth and precise finish on the mold surface to produce high-quality parts.

Role:
The mold surface directly imparts the part’s appearance and texture. Any imperfections or irregularities on the mold surface can translate to defects on the molded part.
5. Gate Types
The gate is the point at which molten plastic enters the mold cavity. Different gate types are used to control the flow of plastic into the mold and minimize cosmetic defects on the finished part.
Role: The choice of gate type and its location impacts the distribution of material within the thin wall injection molding part. Proper gate design ensures that the part fills uniformly and that there are minimal or no sink marks on the part’s surface.

Understanding the roles of these key components and how they interact is essential for achieving consistent, high-quality injection molded parts. Each component contributes to the precision and efficiency of the assembly process, ensuring that the final parts are ready for seamless assembly. In the following section, we will explore a fundamental rule of thumb in injection molding design.
IV. What is the Rule of Thumb for Injection Molding?
In the world of injection molding design, precision is paramount. To ensure that your parts are not only manufacturable but also aesthetically pleasing, you’ll want to familiarize yourself with the “3-2-1 rule.” This rule of thumb governs the use of draft angles in injection molding and plays a crucial role in determining the final finish of your parts.
The 3-2-1 Rule for Draft Angles
The “3-2-1 rule” is a guideline that dictates the angles by which the walls of a part should be tapered, or drafted, to facilitate its removal from the mold. It’s a fundamental principle that addresses the practicality of ejecting the part from the mold without causing damage or deformation.

3 Degrees for Textured or Fine Finishes:
When the surface finish of your part is critical, such as when you need a fine texture or a polished appearance, a draft angle of 3 degrees is recommended. This slight angle allows for a gentle release from the mold while preserving the part’s surface quality.
2 Degrees for General-Purpose Finishes:
For most injection molding applications where a standard or general-purpose finish is acceptable, a draft angle of 2 degrees is commonly used. It strikes a balance between ease of ejection and surface finish.

1 Degree for Polished or High-Gloss Finishes:
When you require a part with an exceptionally smooth and high-gloss surface finish, a draft angle of 1 degree is appropriate. This minimal draft angle allows for the use of highly polished molds without compromising part release.
Significance of the 3-2-1 Rule
The 3-2-1 rule serves two essential purposes in injection molding:
Easier Ejection:
Tapering the walls of the part with draft angles makes it significantly easier to eject the part from the mold. Without draft angles, parts may stick or become damaged during ejection.

Cosmetic Quality:
The choice of draft angle corresponds directly to the final finish of the part. Finer finishes require shallower draft angles to preserve surface quality, while standard finishes can accommodate slightly steeper angles.
Understanding and applying the 3-2-1 rule in your injection molding design is critical for achieving both practicality and aesthetics. It ensures that your parts are not only easy to produce but also meet the desired surface finish standards. In the following section, we will continue to explore crucial aspects of injection molding design and their impact on the assembly process.
V. Maintaining Uniform Wall Thickness
When it comes to injection molding design, one of the fundamental principles that cannot be emphasized enough is the importance of maintaining uniform wall thickness. This seemingly simple concept plays a pivotal role in the successful production of high-quality parts. Let’s delve into why uniform wall thickness matters during injection molding cycle and how to achieve it.
The Significance of Uniform Wall Thickness
Uniform wall thicknesses
is the practice of ensuring that the walls of a plastic part are consistent in thickness throughout. This design principle is not arbitrary; it has a profound impact on both the manufacturability and performance of the final product.

Cosmetic Appeal:
Parts with uniform wall thickness tend to have a more polished and aesthetically pleasing appearance. Irregular thickness can result in visible defects like warping, sink marks, or flow lines.
Structural Integrity:
Consistency in wall thickness enhances the structural integrity of the part. Variations in proper wall thickness can lead to stress concentration points and potential weak spots in the part.
Manufacturability:
From an injection molding perspective, uniform wall thickness ensures that the molten plastic flows evenly throughout the mold cavity. This uniform flow minimizes defects and inconsistencies in the part.
Understanding Nominal Wall Thickness
Nominal wall thickness refers to the intended or specified thickness of the walls in a part’s design. It serves as a reference point for achieving uniformity throughout the part.

To maintain nominal wall thickness, consider the following tips:
Design Symmetry: Whenever possible, design parts with symmetry to distribute material evenly. Symmetrical parts are less likely to warp or have variations in wall thickness.
Minimize Thick and Thin Sections: Avoid abrupt transitions between thick and thin sections within the same part. These variations can result in differential cooling rates and structural issues.
Use Ribbing and Gussets: To reinforce specific areas without significantly altering wall thickness, incorporate ribs or gussets. These structural elements can provide additional support without compromising uniformity.
Select Appropriate Materials: Different materials have varying flow characteristics. Choose a material that suits your design and molding requirements to achieve uniform filling.

Prototype and Test: Before full-scale production, create prototypes and conduct testing to ensure that the part maintains uniform wall thickness during the injection molding process.
By adhering to these principles and tips, you can effectively minimize variations in wall thickness and create injection molded parts that not only look appealing but also perform reliably. In the next section, we will explore the significance of assembly design in the overall process.
VI. Assembly Design and Process
Efficient assembly is the final piece of the puzzle when it comes to designing injection molded parts for assembly. Beyond the individual part design, considerations for how these parts come together seamlessly play a significant role in the overall success of your project. Let’s explore the key aspects of assembly design and the features that facilitate the process.
Considerations for Efficient Assembly
- Design for Interlocking: One of the primary goals in assembly design is ensuring that the parts interlock effectively. This means that they fit together snugly without the need for excessive force or additional fasteners. Achieving this often involves precise tolerances and fits in the part design.
- Minimize Fasteners: Whenever possible, aim to minimize the use of screws, bolts, or other fasteners in your assembly. Reducing the number of fasteners simplifies the assembly process and can lead to cost savings.

Key Features for Assembly
Several features can greatly aid in the assembly of plastic components:
- Support Ribs: Support ribs are internal structures designed to add strength to a part. They can also serve as guides during assembly. By strategically placing support ribs, you can reinforce areas that experience stress while ensuring that parts align correctly.
- Threaded Inserts: For parts that require attachment points for screws or bolts, consider incorporating threaded inserts during the injection molding process. These inserts provide secure threads for fasteners, allowing for repeated disassembly and reassembly without damaging the plastic.
- Living Hinges: Living hinges are flexible joints that can be integrated into the design to create foldable or moveable sections within the part. They are particularly useful when designing parts that require periodic access or adjustments.

The Role of the Parting Line
The parting line is the seam or line where the two halves of the injection mold come together. It is an important consideration in assembly design because it dictates how the parts align during assembly. Properly managing the parting line ensures that identical parts produced from the same mold fit together precisely.
- Alignment: The parting line must align with features or surfaces that require precise positioning during assembly. By planning the parting line location strategically, you can ensure that identical parts align correctly without additional adjustments.
- Avoidance of Drag Marks: Misalignment of the parting line can result in drag marks or cosmetic defects on the parts. Careful design and mold construction help minimize these issues.
By taking these considerations into account and incorporating features like support ribs, threaded inserts, and living hinges into your design, you can streamline the assembly process and enhance the overall efficiency of your injection molded parts. In the next section, we will explore strategies for reducing production costs, a vital aspect of any successful plastic injection molding project.

VII. Reducing Production Costs
In the world of manufacturing, efficiency and cost-effectiveness are key drivers of success. The injection molding process is no exception. While producing high-quality plastic components is a primary goal, achieving this without breaking the bank is equally important. Let’s delve into the significance of cost-effectiveness in plastic injection molding and explore strategies to minimize production costs.
The Importance of Cost-Effectiveness
Cost-effectiveness is not about cutting corners or compromising on quality. Instead, it’s about optimizing every aspect of the injection molding process to maximize efficiency, reduce waste, and ultimately deliver a high-quality product at a competitive price. Here’s why it matters:
- Competitive Advantage: In a competitive market, cost-effective production allows you to offer competitive pricing to your customers, giving you an edge over competitors.
- Profitability: Lower production costs directly impact profitability. By minimizing expenses, you can increase your profit margins without sacrificing quality.
Minimizing Production Costs
- Tooling Costs: Tooling costs can be a significant portion of the overall project expense. To minimize these costs:
- Consider Mold Complexity: While complex molds may be necessary for intricate parts, simpler molds are more cost-effective to produce. Evaluate whether the design can be simplified without compromising functionality.
- Mold Material: Choose the appropriate mold material for your project. Steel molds are durable but costly, while aluminum molds are less expensive but may have a shorter lifespan. Your choice should align with the production volume and budget.
- Manufacturing Costs: Reducing manufacturing costs requires a comprehensive approach that encompasses various aspects:
- Material Selection: Opt for materials that strike a balance between cost and performance. Collaborate with material suppliers to identify cost-effective options that meet your project requirements.
- Production Speed: Enhance production speed without compromising quality. Efficient cycle times and machine utilization can reduce labor costs and increase productivity.
- Quality Control: Implement robust quality control processes to catch defects early and avoid costly rework or scrap.

Collaboration with Injection Molding Partners and Material Suppliers
Successful injection molding projects often depend on effective collaboration:
- Injection Molding Partner: Collaborate closely with your injection molding partner. Their expertise can help identify cost-saving opportunities, optimize processes, and ensure that your design aligns with efficient production.
- Material Suppliers: Build strong relationships with material suppliers. They can provide valuable insights into cost-effective material options and assist in sourcing quality materials at competitive prices.
By fostering these collaborative relationships and incorporating cost-effective strategies into your injection molding design and production processes, you can achieve a balance between quality and affordability. This balance is key to delivering value to your customers while maintaining a healthy bottom line.
In the concluding section, we will recap the key takeaways and emphasize the importance of understanding the intricacies of injection molding design for assembly.

Conclusion
In the world of injection molding, success hinges on the harmonious interplay of design, engineering, and collaboration. Understanding the injection molding process and design principles is not merely a choice; it’s a necessity. It’s the path to creating parts that not only meet the highest quality standards but also come together seamlessly during assembly.
As you embark on your injection molding projects, remember that innovation is at its best when it combines with precision. Design with care, collaborate with experts, and strive for excellence. With each carefully crafted part, you contribute to the world of efficient and cost-effective manufacturing.

